A guided tour of the ISOC Science Data Archive (ISDA)
This walkthrough is meant to guide observers new to the ISDA.
1. Starting the ISDA
From the ISDA homepage (http://integral.esac.esa.int/isda/)
click on the Start the ISOC Science Data Archive (ISDA) Interface
link, and then on the Start ISDA Browser button to start the
archive browser. Starting may take up to several seconds, depending on
the speed of the link, the speed of your computer etc. If you have any
problems starting the archive, please click on the `Any problems running
the applet?' section for help. Be reminded that for the ISDA to work,
your browser has to be Java compliant, if not please install the latest Java2 following
the instructions provided here.
Java must be turned on, of course (you may have it disabled by default in your browser)!
2. Help! If you need somebody ...
In general, any box that lights up when your mouse goes over it can be
clicked on to give help. Two lists of Frequently Asked Questions (FAQ)
are available at the ISDA home page. The former deals with solutions to
common technical or installation problems. The latter offers step-by-step
recipes to accomplish basic query and/or retrieval tasks. If you
still feel lost, consider contacting the ISDA Helpdesk.
3. Logging in
Unless you don't intend to retrieve any data, it is advisable to login.
To do this just click on the Login/Register button. A new
screen appears, asking to enter your username. If you have already
registered then enter your username and password. Note that only the
first eight characters are recognized. The case is important only when
entering the password.
You can then either click on the button Login & Proceed
to go back to the screen you came from, or on Login & stay here
to remain on this page and change your details/password.
If you haven't registered you can do it via the Register As New
User button. This takes you to a screen where you may enter your
details. We suggest to choose as username your initial followed by your
last name (e.g. for Owen Williams enter: "OWILLIAM"). Confirmation of
registration will be by e-mail, so you can ensure that your e-mail
address is correct. If you make a mistake when entering anything you can
press the Clear button at the bottom. If you want to exit this
screen without doing anything, click on Cancel. These last two
buttons have the same function in several ISDA panels.
4. Essential INTEGRAL Terminology
Dither Patterns
To make the best use of its coded mask instruments INTEGRAL normally performs
a dither pattern around the source being observed. A number of dither
patterns exist, including "5x5" and "Hex". If a dither pattern is not performed the
satellite is said to be in "staring" mode.
Science Windows (SCW)
INTEGRAL data is divided up into SCWs by the initial processing software:
typically there will be one SCW for data from each pointing in a dither pattern and
also one SCW for data from each slew between the pointings. For many analysis purposes data can
be selected by SCW without reference to the observation to which it belongs.
Observation Data Set (ODS)
An Observation Data Set (ODS) refers to a selected set of SCWs and to the output
from one run of the standard analysis for one instrument performed on that set.
At the moment there are two forms of ODS found in the archive: ones which
contain only single SCWs (refereed to as an SS ODS) and ones which contain all the SCWs from a particular
observation in a particular revolution (refered to as an SM ODS). Only IBIS and JEMX ODSs are
currently found in the archive.
For short observations contained in one revolution an SM ODS will
cover the same time period as the observation, while for longer
observations there will be several SM ODSs.
Note that the term ODS used in the ISDA is identical in concept to the
term Observation Group (OG) used in the Offline Science Analysis (OSA) documentation.
Experience has shown that the new user of INTEGRAL data often expects an OG to be a group
of observations so we have avoided this term.
5. Searching data
You should now be on the `Query Specification' screen. Any box in white
is where you can enter text or numbers except the top-right white box
which indicates the status of the ongoing action. In the case of a
query, for instance, it will change from Idle to Conducting
Query to Generating List of Entries. If a name resolver
is used, this box will indicate the coordinates of the searched
(resolved) object(s).
The top-left narrow window indicates whether your archive browser is
busy doing something. As long as the small blue box is moving, the
archive browser is actually doing something. Please, note that any
actions (e.g., a query) can be interrupted just by clicking on
the, e.g., Cancel query button.
Any box in grey is a selection box - clicking on it changes your
observation selection. At the top of the query specification screen
there are three such boxes (See Fig.1):
- Results display. This specifies which catalogue is to be
returned. It can be set to Observations , Observation
Datasets , Science Windows , or MULTIPLE .
Note that the information displayed can also be modified from the
results page itself.
- Sort criteria: specifies how the entries returned by the search
are to be sorted e.g. Observation Start Time or Distance
from Nominal Pointings.
- Sort order: ascending or descending.

Fig.1 - Top of the ISDA query specification screen.
The "Query specification" screen is dividend in 6 sub-panels in
which the actual query is given.:
- "Principal search criteria" (see Fig.2), which allows you to
search on:
- Observation identifier
- Observation availability (i.e., observations for
which only browsing is possible, or observations whose data are also
accessible for retrieval to the user)
- Coordinates (equatorial, Galactic, ecliptic). It is possible
to search for sources which fall inside a cone, or inside a box, or
inside the field of view of selected INTEGRAL instruments.
- Target name. To search using NED instead of SIMBAD then just
click on the SIMBAD button to change the name resolver. If you want to
search by what the user entered as a target name then select Given
by Proposer. As a general rule, searching on a string in the ISDA
user interface looks for all occurrences of that string in the database,
either exact or not exact. For instance, to search for all the objects
of the NGC catalogue, you may enter `ngc'.
- Target list file: listing targets to be searched for
- Coordinates display: can be Sexagesimal or
Decimal
- Observation start, stop or ontime
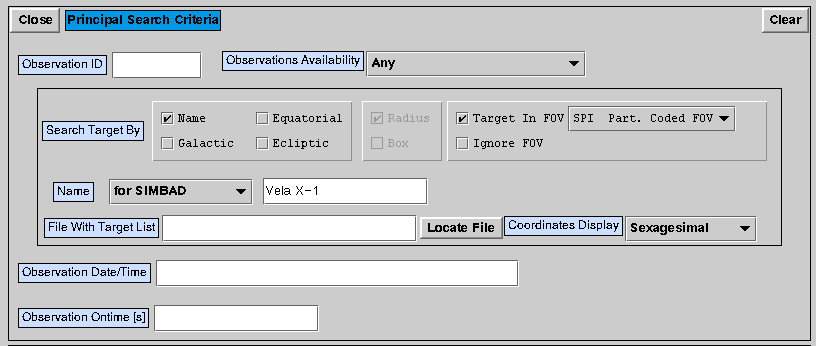
Fig.2 - "Principal search criteria" panel in the query
specification ISDA screen.
- "Revolution and observation" (see Fig.3), which allows you to
search on:
- Revolution number
- Observation dither pattern:
- Any - Any dither pattern
- Staring - Staring mode (i.e no dithering)
- HEX - Hexagonal dither pattern
- 5x5 - 5x5 dither pattern (the most common)
- GPS - Galactic plane scan
- GCDE - Galactic Centre Deep Exposure
- MULTIPLE - Any combination of dither patterns

Fig.3 - "Revolution and observation" panel in the query
specification ISDA screen.
- "Observation data sets (ODS) and exposures" which allows you to
search on parameters associated with an ODS or exposure (see Fig 4):
- ODS ID
- ODS duration
- Exposure ID

Fig.4 - "Observation data sets and exposures" panel in the
query specification ISDA screen.
- "Science windows" (SCW) (see Fig.5), which allows you to search
on:
- Revolution number(s)
- Science window date/time
- Science window ontime
- Science window ID
- Science window type
- Any
- Pointing
- Slew
- Non-science
- Undefined
- MULTIPLE

Fig.5 - "Science windows" panel in the query specification ISDA
screen.
- "Instrument modes" (see Fig.6), which allows you to select the
modes of the 4 instruments:
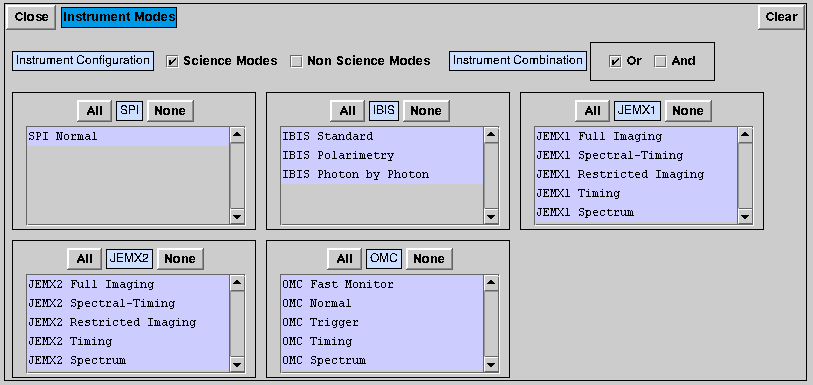
Fig.6 - "Instrument modes" panel in the query specification
ISDA screen.
Clicking on All or None, all the items in the corresponding menu
are selected or deselected, respectively.
The "Instrument" sub-panel includes four special buttons:
- Science modes: if selected, science modes are available for
queries
- Non science modes: if selected, non science modes are
available for queries. It can be selected together with the Science Mode
button, or alone
- Instrument combination OR: if selected then the instrument
modes must match for at least one instrument
- Instrument combination AND: if selected then the instrument
modes must match for all instruments
- "Proposal" (see Fig.7), which allows you to search on:
- Proposal identifier
- PI name
- AO number
- String in abstract
- Prime instrument
- Proposal category
- Proposal program
- PI country

Fig.7 - "Proposal" panel in the query specification ISDA screen.
- "ISGRI Source Catalogue" (see Fig.7a), which allows you to search the ISGRI source on
- Source name
- Source flux
- Source hardness ratio
- Source type
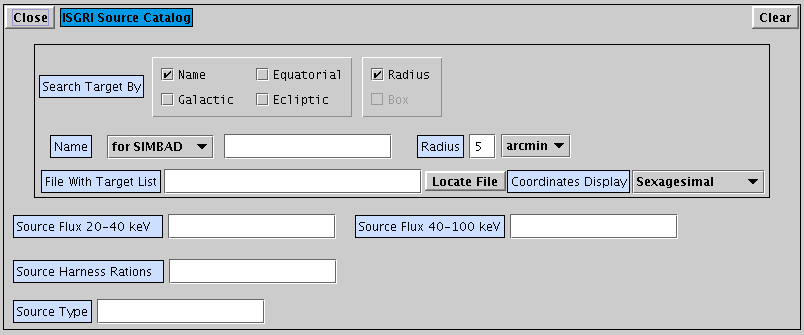
Fig.7a - "Source Catalogue" panel in the query specification ISDA screen.
Whenever the option Any is selected in a selection box, the
corresponding parameter is not used for the query. Similarly, parameters
belonging to a closed panel are not used for a query.
6. Search result display
Let's try and search now for any observation you wish. For example,
let's search for all the Integral observations of 3C 273. Type `3C 273'
in the Name widget. Clicking on the button marked Execute
Query starts the search.
Your applet will attempt now to contact Simbad to find out the
position of the object called `3C 273'. When it gets its coordinates it
searches the ISDA database for all observations around them, within a
radius defined in the Radius box (by default 5 arcmin). Once
the search is completed, in the results screen one record for each 3C
273 observation will appear. By default 25 entries are listed per
page. You can change the number of entries per page with the associated
top-right button and use the Start of list, Previous,Next
and End of list buttons at the bottom to navigate the
observation list (or catalogue) pages.
With the ISDA, it is currently possible to create four types of
catalogues as a result of a query:
- an observation catalogue, i.e. a list of all
the Integral observations matching the query. The records of the
observation catalogue are white
- an ODS catalogue i.e. a list of all Integral
ODSs matching the query. The records of the exposure catalogues are
blue.
- a SCW catalogue, i.e a list of all
Integral SCWs matching the query. The records of SCW catalogue are
orange.
- a Source catalogue, i.e. a list of all the INTGRAL sources
matching a query.
You can switch from between the observation, ODS, and SCW catalogue to another using the selection menu
in the catalogue screen (Observation, ODS, SCW;
see Fig.8). The amount of information displayed in the catalogues can
be as well selected, using the menu located close to these buttons. For
example, in Fig 8 the user has choosen to display the Observation
info and Instrument info information from the
observation catalogue. The Refresh list button can be used at
any moment to refresh the current catalogue. This would produce an
observation list with the first four hits shown in Fig.9. Observation
and exposure catalogues can be simultaneously shown in the same screen,
as well as observation and ISDA source catalogues.

Fig.8 - Selection menu in the catalogue screen.

Fig.9 - Observation catalogue for 3C 273.
Observation, ODS and SCW catalogues can be simultaneously shown in
the same screen. Fig. 10 shows an example of the output when we have
chosen to display the Observation catalogue and SCW catalogue (with pointing
information selected).

Fig.10 - Observation catalogue and SCW information for one 3C 273
observation in the catalogue.
Besides each record of an observation catalogue, seven additional
buttons allow you to get additional information on the corresponding
observation:
- ODS, allows to expand individual records of an
observation catalogue to show ODSs contained in that observation.
- SCW, allows to expand individual records of an
observation catalogue to show the consistituent exposures of the
observation. The number of SCWs is indicated on the button.
- Sources, displays the INTEGRAL sources which lie within the fov of this observation.From
this list it is possible to launch the INVITE tool
to display lightcurves etc.
- Details, leads to a page containing technical
information on the observation scheduling and on the proposal, the
observation belongs to.
- Articles, provides you with links to refereed journal
papers, which made use of the observation data. Ultimately, this link
allow to reach the corresponding ADS
entries.
- EXP, allows to expand individual records of an
observation catalogue to show the consistituent exposures of the
observation.
- External Catalogues Searches other catalogues for counterpart sources
If you want to go and start another selection click on the Query
Specification button at the top left.
7. INTEGRAL Visualisation Tool and Explorer (INVITE)
INVITE provides the user with a flexible tool to display INTEGRAL lightcurces, hardness ratios, spectra etc.
It can be launched by right clinking with the mouse over the lightcurve icon in the source catalogue (see Fig 10a).
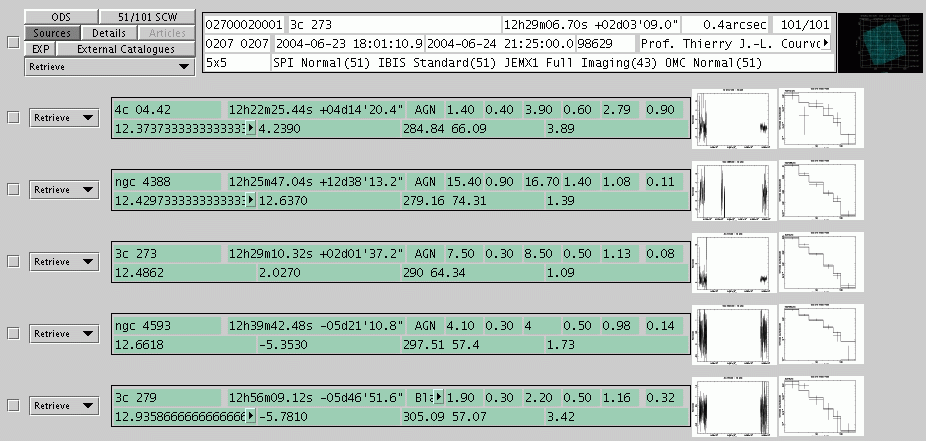
Fig.10a - ISDA observation and source catalogues.
The opening screen of INVITE is shown in Fig 10b. Full user documentation is available.
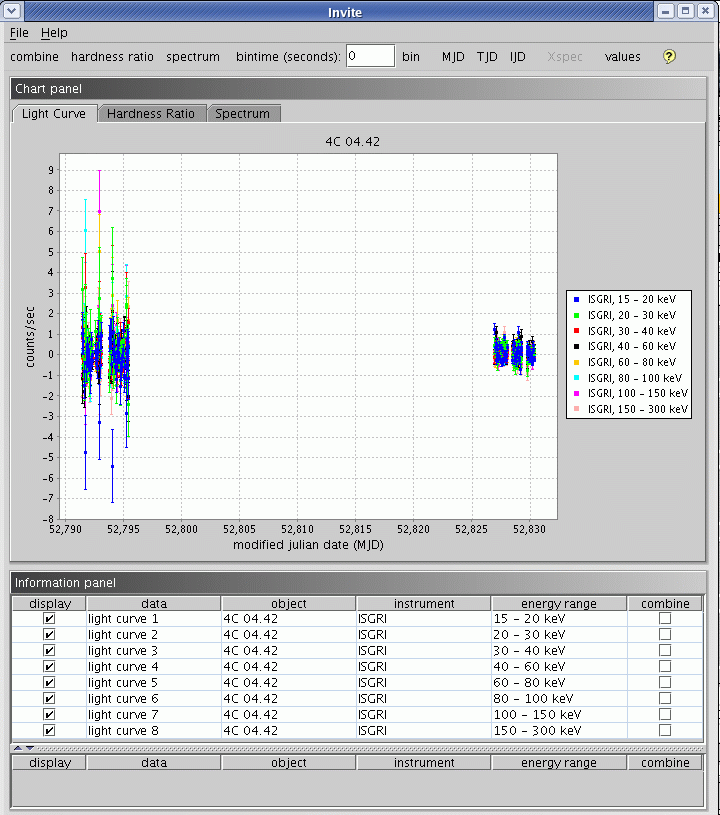
Fig.10b - Opening screen of INVITE
8. Options to retrieve data
You may follow either one of the following paths to retrieve data from
the ISDA:
- Use the Retrieve button besides each observation
(illustrated on Fig.9, Fig.10 and Fig.11) or ODS record (see Fig.11), or
SCW (see Figs.10/11) for direct data download. This button activates
directly an ftp session, downloading data products corresponding to that
observation or exposure.

Fig.11 - ISDA catalogue panel. The "direct download" button (Retrieve)
is located besides each observation (white) or ODS (blue) or SCW
(orange) record.
- Transfer the records of the observations/exposures/ISDA source
catalogues, whose data you want to retrieve, into a "shopping basket".
This method is envisaged for complex, multi-observation or
multi-exposure retrieval requests. Once the shopping basket contains all
the datasets you intend to retrieve, these can be transferred to a
secure ftp area. Both the above methods allow the same retrieval
options:
- All retrieve all data associated with this
observation, ODS or SCW. This includes the standard analysis output, and
(optionally) the calibration and auxiliary data.
- MULTIPLE can be used to combine any of the other
options in a single retrieval request, however as there is currently only one other option it is currently redundant. The customized retrieval of data
products implemented in the XMM database is not yet available for ISDA.
8. Selecting data and moving it to the shopping basket
To select data for retrieval just click on the little square to the
left of each record of the catalogue, next to the Details
button (the little square will appear now as a selected checkbox). and
then click on Move selected to basket. The observation will
disappear from the results screen. To see what's in your shopping
basket, click the button at the top of the screen marked Shopping
basket. You will see the text there turn from faint to dark grey
and the text in the Latest Results button turn faint. The
observations, ODSs or SCWs that you intended to move shall now have
disappeared to the current panel and appeared in the shopping basket
panel. To move between the shopping basket and the query results screen
click on the above two buttons - a blue box just below the ISDA logo
tells you where you are.
It is possible to move to the shopping basket entire
observations, ODSs, or indivdual SCWs. SCWs and ODSs pertaining to
different observations can be freely selected and combined in the
shopping basket. If you want to request ALL the observations that your
query produced you can click on the Move All to Basket button.
This will move all the observations into the Shopping Basket and it will
also take you to the Shopping Basket so that you can make the request
straight away.
9. In the shopping basket
The shopping basket contains the instantaneous list of all the
observation, exposure and ISDA source catalogue records, whose data are
available for you to retrieve. You can delete items from the shopping
basket by clicking on the little box to the left of them and then
clicking the Delete selected box in the upper right.
When records corresponding to observation, exposure and ISDA
source catalogues are simultaneously present in the shopping basket, the
button Next in the top left corner allows you to select the
type of products you want to retrieve for each level.
A quota on the volume of retrievable observations per user exist
if one employs the shopping basket as retrieval method. This quota is
currently set to 2 GBytes per user. The quota is refreshed every three
days. If you think you need an increase of your own quota, please do not
hesitate to contact the ISDA
Helpdesk, so that we can examine which is the best way to help you.
No quota exist on the direct download (mechanism 1. above).
When you are happy with your retrieval choice, you can retrieve
the corresponding dataset(s) by clicking on the Submit Request
button,
10. Retrieval
The last step prompts the overlay of the Request summary
panel. In this panel the number of requested observations, the size of
the dataset and the remaining quota are reported. You can go back to the Query
specification or to the Latest Results screen if you want
to change your query or shopping basket selection, respectively. You can
choose to request calibration files and auxiliary data along with your
science data. The retrieval option for auxiliary data is set to "yes" by
default. You can also choose whether you prefer the PPS products as
individual files (which can be browsed in the ftp area) or as a
single tarfile (ODFs are always distributed as an individual gzipped
tarfile). Confirm your request with the button at the bottom of
the panel. A request ID (of the form "OWILLIAMXX") is shown. This means
that the generation of the dataset has started. An e-mail will be sent
to the request originator as soon as the data ara available on the ftp
area for retrieval. An example of such an e-mail is shown below:
Dear ISOC Science Data Archive User,

Your retrieval request has been successfully processed.
The data may be retrieved from the following address where
they will remain for 3 days.

Please follow the instructions below to access/browse the
ftp area where your data are located:


ftp isda.esac.esa.int
anonymous
<your email address as password>
prompt
cd /pub/OWILLIAM236
binary
dir

You can also access your files online from the browser at:
ftp://isda.esac.esa.int/pub/OWILLIAM236
where you will be able to see some of the products on-line.
The final size of your request was 4476.758


 The list of files which have been copied is attached
at the bottom of this message.

 You can get more information about the Integral project by
accessing the Integral web pages from the following URL:

     http://integral.esac.esa.int/isda/

 If you have any questions, please cont
 act the Integral HelpDesk:

     inthelp@sciops.esa.int

 Best Regards,

 The ISOC Science Data Archive team


The following files have been copied:
============================================================================

/isda/rev_2/scw/0032/rev.001/prp/isgri_prp_noise_20030119160949.fits.gz
/isda/rev_2/scw/0032/rev.001/raw/jemx2_raw_frss_20030118080111_00.fits.gz
/isda/rev_2/aux/adp/ref/revno/revolution_20030312.fits
/isda/rev_2/scw/0032/003200500010.001/picsit_histo_sish.fits.gz
/isda/rev_2/scw/0032/003200410010.001/omc_gti.fits.gz
[...]
11. Other data needed for INTEGRAL Analysis
When you have downloaded and unpacked data from the ISDA you will end up with a directory which looks as follows:
aux obs_isgri obs_jmx scw
or if processed ODS data has not been included simply
aux scw
In order to analyse this data you should then include (most conveniently
by the creation of links) the three directories cat, ic and idx included in the OSA distribution. These
contain essential catalogue and calibration information.
12. Exiting
Just click on the `File' menu at the top left of the applet and select Exit.
Note that when you exit all selections will be lost. It may be
advisable to keep the applet available, but minimized. Note that when
you
exit your Internet browser, or move the browser window from the page
from which the applet was started, the applet will also vanish.
Send your questions about the ISDA to the:
ISDA HelpDesk


